


No products in the cart.
Payment methods accepted
Unsure what Ethernet cable you need?
Look no further than our Ethernet Cable Finder. Answer a couple of questions and let trueBOT guide you to the perfect cable for any situation.
Still have questions? Check out our in-depth blogs, insightful white papers, and instructional videos on all things Ethernet cable and low voltage supplies.

Read: The Difference Between Cat6 vs Cat6A Ethernet Cable

Understand: Selecting the Correct Outdoor Ethernet Cable
Time to find coaxial cable and connectors for your install? Well, you are in the right spot!Check out our in-depth blogs, white papers, and instructional videos about everything going on in the low voltage industry and one of the best sources for coaxial information.
Have questions? Our networking experts have the answers!Check out our Cable Academy. for more information.
Read: The Difference Between Dual Shield vs Quad Shield Coaxial Cable
Understand: How To: Universal RG6 Compression F Connector on Quad Shield Coaxial Cable
Fiber Optic expertise at your fingertips.
Looking to deepen your understanding of fiber optic technology? Look no further than trueCABLE's Cable Academy. Our extensive collection of blogs, masterfully crafted by industry experts, offers a wealth of invaluable insights into the world of fiber optic cabling.
Have questions? Our networking experts have the answers.Check out our Cable Academy. for more information.
Read: Fiber Optic Splicing: Examining the Factors that Affect Splice Performance

Understand: Using Fiber Optics to Extend Your Ethernet Network Beyond Copper's Limits
Effortless cable management. Learn how we do it.
Low-voltage tools and accessories should keep your networking installations clean and organized. trueCABLE has a variety of high quality cable management tools, accessories and informative blogs for all your installation needs.
Check out our Cable Academy today and expand your knowledge.
Read: How To: Copper Fabric Strips for Bonding Shielded Ethernet Cable
Understand: When Aliens Attack! Avoiding Ethernet Alien Crosstalk

Written by Dave Harris, trueCABLE Technical Specialist, BICSI INST1 Certified
It probably hasn’t escaped your attention that communications networks are getting faster. More and more technologies require network speeds that occasionally test the performance limits of copper twisted pair communications cable. Because of its ability to overcome limitations to speed and distance imposed by copper cable, optical fiber provides a compelling alternative to copper cable. Since prices of optical fiber and its associated electronics are becoming more competitive to copper, and availability is increasing, many people are choosing to install optical fiber in their network, some for the first time in their experience.
Optical fiber is fundamentally more delicate than cables made from metal. When the fiber is subjected to an impact from the side, it will break, and it doesn’t take much force to do it. Simply tossing a coil of optical fiber onto the floor of a truck bed, just like you might do with a coil of copper cable, can break the fiber core. And if the fiber is damaged in this way, it is unlikely to be discovered until after the cable is installed and electronic testing fails.
You simply can’t handle and install fiber optic cable using the same methods that are used for copper. The relative fragility of fiber when compared to copper cable requires special care, special practices, and attention to detail during handling and installation. In this comprehensive guide, we'll walk through the best practices for installing various types of fiber optic cable, from patch cords to distribution fiber, and provide practical tips to ensure a successful installation.
The number one cause of signal loss in optical fiber installations is dirt on the fiber end faces. Exposure of the fiber end face to ambient air for just a few seconds is enough to contaminate the fiber with dust. We recommend that you own a fiber optic cleaner for your type of connector, and use it every time the end faces are exposed. Every time you unplug a fiber connector, it should be cleaned before you plug it back in. Even a brand new fiber patch cord should be cleaned prior to installation. This should be a habit that eventually becomes automatic. With that out of the way, let’s get into some best practices!
Fiber optic patch cords were designed to provide high speed Ethernet interconnects within data cabinets, data rooms, and data centers, where dedicated fiber optic pathways are often provided. With ever increasing network speeds, unarmored fiber patch cords are now being used in telecommunications racks and in small distribution applications. These are use cases for which they were not originally intended.
Although fiber optic patch cords are constructed to provide some protection from lateral (“from the side”) forces, they are still delicate and vulnerable. Consider this: If a fiber optic patch cord is installed in a basket tray or ladder rack, it is already at risk. In both cases, the metal of the rack imposes highly localized lateral forces on the fiber. With only the fiber in the tray, the force is limited to the weight of the cord, but since the force is not spread out, there is risk of breakage at that point. The same is true if using bridal rings or j-hooks.
Now imagine that someone pulls a big bundle of copper cables through the same pathway. If any part of that heavy bundle ends up on top of our little fiber patch cord, it will crush the fiber between the copper cable bundle and the steel rods that make up the tray.
Similar dangers are encountered when installing fiber patch cables inside network equipment cabinets. The metal edges found inside cabinets and on racks are not particularly sharp, but to a fiber patch cord, they might as well be. The actions of installing and servicing copper cables located in the same cabinet can put the fiber cables at risk for damage.
So what’s the take-away from this? Best practice is to:
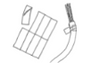
Take a look at the cabinet in Figure 1. This cabinet is too small for the equipment and cabling that it is trying to contain. It is also too shallow to allow for horizontal cable managers, and too narrow to allow vertical routing of cable. The spider web of copper patch cables velcroed across the front of the equipment is necessary to contain and route all of the interconnects and still allow the cabinet door to close.

Figure 1. The two yellow fiber patch cords in this enclosure(descending from the top right) are endangered by co-locating them with copper cables.
Unfortunately, the two fiber optic patch cords descending from the top right have been positioned between the copper patch cables and the equipment mounting frame. Every time the door is opened and closed, the copper patch cords are pushed inward against the fiber cords, which are in turn pushed against the metal rack uprights providing repeated opportunities to break the fiber.
So what’s the solution? To start with, use a cabinet that’s big enough for the job. But in many cases, we are limited to the tools and equipment that we have, and need to make them last as long as possible. In this case, the fiber patch cords should be routed through a small piece of flexible innerduct, which will protect the fiber when subjected to lateral forces.
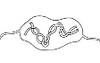
That strategy is employed to good effect in Figure 2. All of the vertical cable managers are populated with copper patch cables, without a safe place to route the fiber. In this installation, the fiber is enclosed in an orange flexible duct. You can see the duct exiting the fiber splice tray near the top right of the photograph. It extends down to the bottom of the vertical cable manager, where you can see two aqua-colored multi mode fiber patch cords exiting the duct and connected to the two switches near the bottom.

Figure 2. An orange flexible innerduct protects the fiber patch cords in the vertical cable manager on the right.
The flexible duct does a good job of keeping the copper cables and fiber cords separate. The best practice, however, is to plan your rack installation so that you can route copper cables on the left, and optical fiber on the right. A straightforward example of this is shown in Figure 3. Only one vertical cable manager is used for this rack. It is located on the left side and it is very large, because it is intended to contain all of the copper patch cables used in the rack. The fiber patch cords are then routed down the right side of the rack, completely protected from the weight of that large mass of copper.

Figure 3. Best practice: copper on the left; fiber on the right. But can you spot the installation error in this photo?
Although the installation in Figure 3 might look a little messy, it’s going to look neat and tidy after the covers are installed on the vertical and horizontal cable managers. There is one problem with this picture, though. Can you spot it? One of the fiber patch cords is pulled too tight at the switch, and its minimum bend radius is not maintained. This patch cord either needs to be adjusted to restore proper bend radius, or replaced with a cord that is long enough. If it is not corrected, signal loss will result.
Hopefully by now you’re getting used to the idea of fiber patch cords being delicate and are planning to handle them with care and attention to detail. In keeping with that practice, we recommend that fiber patch cords be placed into position and not pulled. They just weren’t engineered for conduit installation. However, there are situations where installing a fiber patch cord in a section of conduit is not avoidable. Also, how do you actually get your fiber patch cord into a flexible duct tube to save it from the big bad copper cables?
All fiber optic cable contains a strength member made up of aramid (Kevlar) fibers that don't stretch or break. Any fiber optic cable must always be pulled by its strength member, or it can be irreparably damaged. Fiber patch cords are no exception. So how do you pull a patch cord, if you can’t even see the strength member?
Again, we do not recommend pulling fiber patch cords through conduit, and your patch cord is not guaranteed against pull tension damage. But we know that you’re going to do it anyway, so this is how we imagine you might succeed.
Believe it or not, you pull by the connector. In a factory-made fiber patch cord, the connector is actually crimped to the strength member. This crimp connection is shown in Figure 4. When you pull by the connector, you are pulling the strength member, depending on the reliability of the crimp joint. Even if you were to pull by the strain relief ferrule, you would just be pulling it against the connector, which is the only thing in the entire cable that is attached to the strength member.

But be careful! You still can’t pull this like other types of cable. Don’t just tie a pull string behind the connector and start pulling. If you do, the connector will travel down the tube at an angle, the end caps can be pulled off by friction, and the end faces of the fiber can be damaged. Also, if too much pull tension is applied, you can overcome the crimp joint and pull the connector right off the cord, ruining it.
Always use a “pull sock” or a fiber pulling eye kit (Figure 5) to prepare fiber patch cords for pulling. This device protects the connector during pulling and spreads the pulling force to relieve tension on the crimp joint for the strength member. Attach a swivel to the pulling eye to protect the fiber from twist strain.

Figure 5. Pulling eye kit.
If you feel any resistance while pulling, you must stop and fix the problem, or you will pull your patch cord apart. The jacket is not designed to rub against the walls of conduit. If your conduit has any bends, lubricate the cable to protect against abrasion damage.
Whew! If that sounds like a lot, remember that patch cords weren’t designed for this. There is some good news, though. When your fiber breaks, the strength member won’t, so you can use it to try to pull another cable through.
Distribution fiber is engineered to be installed in buildings between rooms, or outdoors between buildings. It is available with jackets for plenum, riser, and outdoor applications. We’re going to talk about them at the same time, however, because their heavy duty distribution jackets, plus the fact that they are installed prior to connector termination make them suitable for using the same cable pathways used for copper Ethernet cable installation. Distribution fiber can be installed in basket trays and ladder racks. Because it is unterminated, it can be pulled through the #1 conduit found in most commercial network systems.
Like all optical fiber, it is pulled by the strength member. Always. Strip back a few inches of cable jacket to expose enough of the aramid yarn (Figure 6) to tie to a pull string. Adding a swivel is a good idea, and it’s more important for longer pulls to keep the cable from twisting. When pulling through conduit, it’s a good idea to protect the end of the cable with electrical tape. Although that does increase friction, it can help keep water out if the conduit is underground. It can also help keep the leading edge of the cable from catching on small obstructions. Cut off a few inches of cable after the pull to get rid of any tape or damage to the leading edge.

Figure 6. Unterminated bulk distribution fiber, showing the fiber strands and the aramid yarn strength members.
What if you strip back a few inches of jacket and there is no aramid yarn strength member to be found? That means that the aramid fibers are incorporated into the cable jacket, and the jacket doubles as the strength member. This is the only case where fiber is pulled by the cable jacket, just like copper twisted-pair cable. If your fiber cable is like this, use a pull sock to pull the cable jacket. Alternatively, you can attach the pull string using a minimum of three half-hitches and then secure the knot with electrical tape. When pulling bundles, stagger the cable ends as shown in Figure 7.

Figure 7. Use half-hitch knots to secure cable to pull string.
For both fiber and twisted-pair copper cable, long runs are often installed using teams of technicians. One technician at the lead, another at the reel, and usually one at each change in direction. Typically, the technician at the reel will roll off some cable so the other installers will have slack pulls. If it’s copper cable, the cable can be pulled off the reel by the jacket. If it’s fiber cable, you can’t pull it by the jacket, unless the jacket is also the strength member. The technician at the reel must roll off slack by turning the reel, and not by pulling on the cable.
Distribution fiber is often externally armored with corrugated metal. The corrugated metal surface fits the hand so perfectly and is so easy to grasp that many people are tempted to pull the fiber by the armor (Figure 8). Please try to resist this temptation. It is very easy to pull the armor right off the cable. Always pull by the strength member.

Figure 8. Here’s some fiber with corrugated armor. Doesn’t that surface look like it would be great for gripping and pulling? It turns out that’s not for us installers.
Armored cable requires a special tool for cutting the external armor without damaging the cable inside. An example of an armor cutter is pictured in Figure 9.

Figure 9. Cutter for corrugated metallic armor. (www.kleintools.com)
If the fiber has metallic armor, whether installed indoors, outdoors, or both, the armor must be grounded. This can be a challenge at residential sites, but armored fiber is usually only found in commercial installations. Special fittings are available for bonding the armor to a grounding conductor, which is then bonded to the primary bus bar (PBB). You can read more about grounding in commercial installations in Commercial Bonding and Grounding of Ethernet Cable Systems.
Once bulk distribution fiber is pulled, installation is still not complete. Bulk fiber must be terminated in place. Fiber termination requires specialized tools and training, and is beyond the scope of this article. You can learn more about fiber splicing and termination at our Cable Academy:
As mentioned earlier, fiber optic splicing and termination require a significant amount of training, investment, and preparation. It also presents unique safety issues that involve tiny shards of glass fiber that must be kept strictly away from contact with any living organism. For these reasons, many people choose to special-order a custom pre-terminated fiber optic distribution cable. (Figure 10.) These can be built to the customer’s specifications for length, number of fiber strands, connector type and end polish. They come with a pre-installed pulling sock, with a pull ring in place, and the connectors covered and protected.
Unlike fiber optic patch cords, pre-terminated distribution fiber is engineered for pulling through conduit or other suitable cable pathways. We still recommend using a swivel to prevent twist strain but other than that, this fiber is ready to pull. Easy, right? We hope so, but there are still a couple of things to prepare for.
This cable comes on a reel. To pull the cable, the reel needs to be mounted on an axle so that the fiber can roll off. If the fiber is not rolled off the reel, it will be very difficult to proceed with the pull. We offer a Cable Caddy for installers who do not yet have a solution for this.
One more thing, and this can turn out to be a really big “gotcha” if you don’t know ahead of time. The pull ring on our pre-terminated fiber has a diameter of 30mm. That means that 1-½” conduit is the minimum size that will accommodate this system. I guess it’s a good thing you decided to read all the way to the end.
Installing fiber optic cable requires a different approach than traditional copper cabling. By understanding the delicate nature of fiber, using proper installation techniques, and paying attention to detail, you can ensure a successful fiber optic installation. Remember to always pull fiber by the strength member, use appropriate protection in shared pathways, and consider pre-terminated solutions to simplify the process. With the knowledge and best practices outlined in this guide, you'll be well-equipped to tackle your next fiber optic cable installation project with confidence.


